
Maintaining PowerShell modules using desired state logic
Published on: 08 February 2021I am a huge fan of PowerShell scripting, desired state configuration and automating repetitive tasks. This allows me to save time and focus on other tasks. One of such a repetitive task is maintaining PowerShell modules on my workstation. I often make scripts for customers who are not always using the latest PowerShell modules. To ensure scripts function properly in their environment, I use the same modules when creating the scripts. This forces me to reconfigure my modules towards a specific version quite often, so it was a perfect task to automate. The result is a PowerShell script that uses a JSON file to track the PowerShell module’s desired version and an ideal candidate to pilot my technical blog.
The script can be found on my Github repository
Before we jump into the script, let’s first touch the different aspects of maintaining PowerShell modules so this can help you understand the script logic and steps.
To efficiently automate tasks tasks inside the Microsoft ecosystem (such as Office 365 and Azure) you usually need multiple modules to achieve the desired outcome. Take for example a script that handles the creation of a user account in Azure Active Directory and applies a specific configuration against the Exchange Online mailbox. The script requires actions to be performed using the AzureAD and Exchange Online modules which need to be installed and loaded into the PowerShell session.
By default, PowerShell contains a set of commands (cmdlets) which offer a specific functionality. To extend the basic functionality of PowerShell, a module can be installed and loaded into the PowerShell session that contain additional commands to execute. These modules can be installed from a repository where the most commonly know repository is the PowerShell gallery hosted by Microsoft on https://www.powershellgallery.com/. Windows machines by default are configured to use the PowerShell gallery as source for modules (also known as a registered repository), although it is possible that your organisation uses a custom module repository.
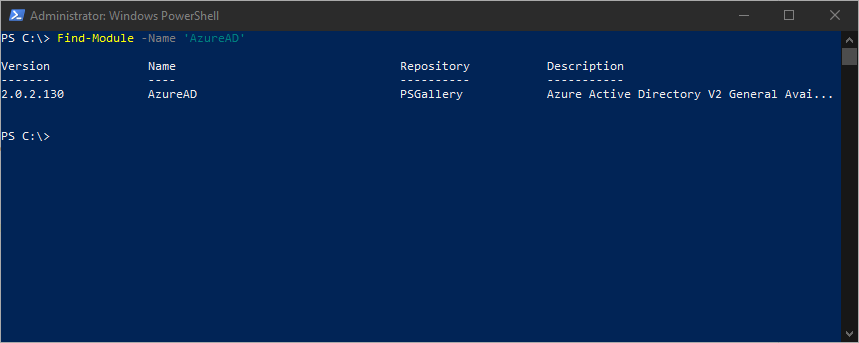
Within a PowerShell session, you can search for modules in the PowerShell gallery using the “Find-Module -Name ‘ModuleName’” cmdlet. This cmdlet performs a search in all registered repositories and will display the latest available version found:
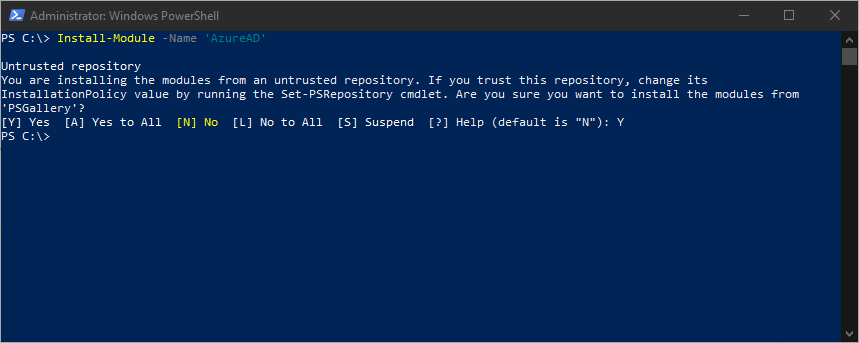
We now have a way to find modules and which version is available, so we can install the latest version of a module by executing the following command in a PowerShell session:
Install-Module -Name 'ModuleName'
With the above command, you migt get prompted to trust the repository. You can suppress this by adding the -Force parameter to the Install-Module command. An essential part when you want to automate this in a script.
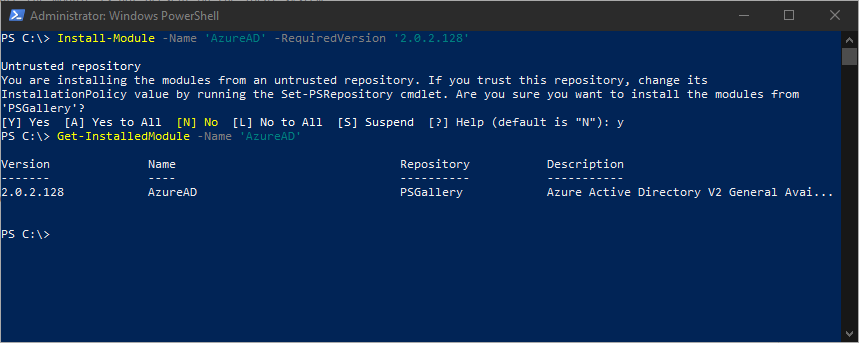
Modules inside the PowerShell gallery are regularly updated and are tagged with a version number. The Install-Module cmdlet has a parameter ‘RequiredVersion’ in which you can specify which version you would like to deploy onto the machine. For example, when you would like to install version ‘2.0.2.128’ of the AzureAD module you execute the following command inside a PowerShell session:
Install-Module -Name ‘AzureAD’ -RequiredVersion ‘2.0.2.128’
At the time you install a specific version, you are 100% sure which version you have deployed. However, after a while you will forget so you need a way to check which version is deployed on the system. This is where the “Get-InstalledModule” cmdlet can be used to display the deployed version number:
Get-InstalledModule -Name 'ModuleName'
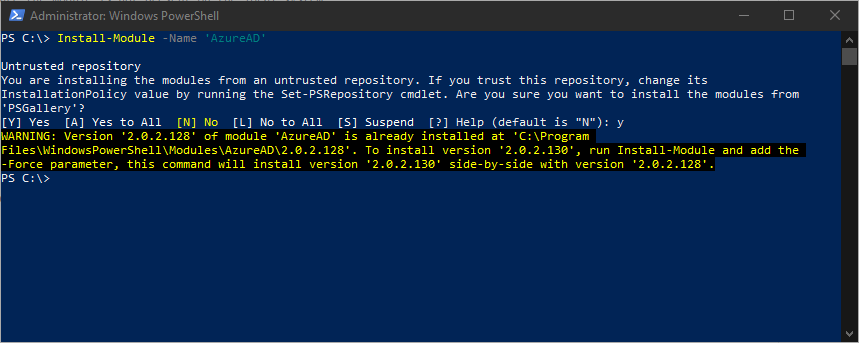
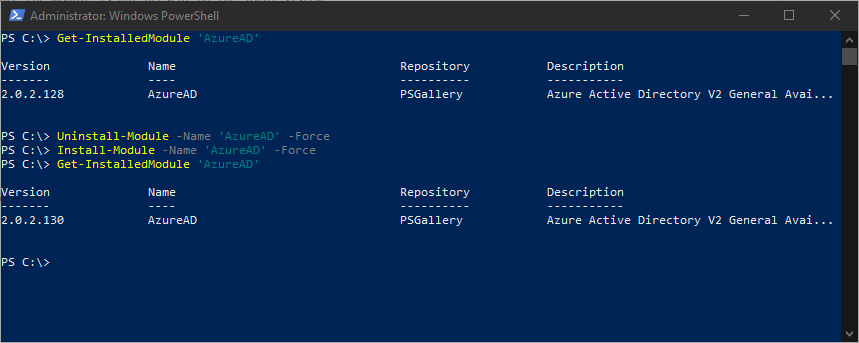
When a new version is pushed by the developers towards the PowerShell gallery, you may want to update towards the latest version. With the knowledge we already gained in this article, we are tempted to run the ‘Install-Module -Name ModuleName’ cmdlet which always installs the latest version. However, when we run the cmdlet you will get the following warning:
Version X.X.X.1 of module ModuleName is already installed. To install version X.X.X.2, run Install-Module and add the -Force parameter, this command will install version X.X.X.2 side-by-side with version X.X.X.2.
From my experience, it’s not desirable to have multiple version installed of the same module as they may conflict with each other. To avoid this, I first uninstall all version of the module by running the Uninstall-Module -Name ModuleName cmdlet before I run the Install-Module -Name ModuleName cmdlet.
Sometimes, preview versions of modules are published towards the PowerShell gallery that can be used to test out new functionality before they are fully released. An example of such a feature was certificate-based authentication for the Exchange Online V2 module. To be able to test out the functionality, you were required to deploy a pre-release version of the module. Something you can achieve by specifying the -AllowPreRelease switch on the different cmdlets used in this article. To install a prerelease version of a module, you execute the following cmlet in a PowerShell session:
Install-Module -Name ‘ExchangeOnlineManagement’ -AllowPreRelease
Now that we know the concepts behind managing PowerShell modules, let’s all bring it together in a script. I wanted to use the concept of desired configuration state (specify the exact configuration you want your modules to be in), a definition file is needed to capture the configuration. For my script, I have chosen the JSON format which I structured as followed:
    {
        "PsModules" : [
            {"Name" : "ModuleName", "Version" : "X.X.X.X"},
            {
                "Name" : "ModuleName",
                "Version" : "Latest",
                "AllowPreRelease" : "True"
            },
            {"Name" : "ModuleName", "Version" : "None"}
        ]
    }
For each module I want to mange, I make an entry that has the following properties:
- Name (required): the name of the module as known in the PowerShell gallery
- Version(required): the desired version of the module. Here we have three possibilities:
- None: module is not required, the script will remove this module from the system when it’s installed
- Latest: the latest available version of the module must be installed on the system
- X.X.X.X: version X.X.X.X of the module must be installed on the system
- AllowPreRelease (Optional, defaults to false): specify if the PreRelease version must be installed on the system.
When the script is started, it will load the JSON file and go through each defined module inside the file. It first checks if the module is currently installed and which version that is installed. The next step is to check the version number of the latest available version inside the registered repository of the system. Once these two are known, some logic is applied to determine what to do next:
- When the module is not installed:
- Check which version needs to be deployed and install when required: none (do nothing), specific version or latest version
- Check if a pre-release version is required
- When the module is already installed:
- Check if the installed version is still the desired version. When this is not the case, remove the module and re-install the desired version.
- Check if the installed module is still required, remove when nescessary
So now when I want to bring my modules up to date or in a certain state, I update the MyModules.json file to my desired configuration. The example belows installs the most common modules to manage a Microsoft 365 environment:
{
    "PsModules" : [
        {"Name" : "Az", "Version" : "Latest"},
        {"Name" : "AzureAD", "Version" : "None"},
        {"Name" : "AzureADPreview", "Version" : "Latest"},
        {"Name" : "MsOnline", "Version" : "Latest"},
        {
            "Name" : "ExchangeOnlineManagement",
            "Version" : "Latest",
            "AllowPrerelease": "True"
        },
        {"Name" : "AIPService", "Version" : "Latest"},
        {"Name" : "MicrosoftTeams", "Version" : "Latest"},
        {"Name" : "SharePointPnPPowerShellOnline", "Version" : "Latest"},
        {
            "Name" : "Microsoft.Online.SharePoint.PowerShell",
            "Version" : "Latest"
        },
        {"Name" : "Microsoft.Graph.Intune", "Version" : "Latest"},
        {"Name" : "Microsoft365DSC", "Version" : "None"}
    ]
}
To wrap up the technical part of this post, we execute the Check-PsModules.ps1 script in a PowerShell session to apply the configuration:
Check-PsModules.ps1 -JSONFile MyModules.json
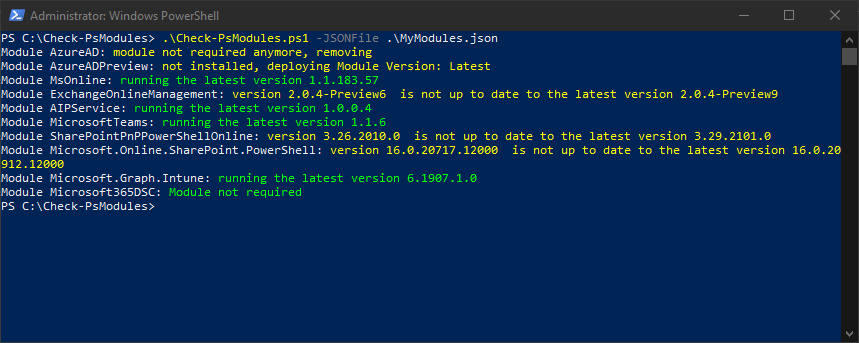
Although it took some time to develop the script, I now gain time each time I need to bring my PowerShell modules in a certain state. An additional benefit is that it also allows me to keep track of my PowerShell modules I’ve installed. Before this script, I regularly installed a PowerShell module and then forgot about it. This resulted in cluttering my system and sometimes weird script behaviour as there was a conflict with a ‘forgotten’ module. Today, when I need a new PowerShell module on my system, I add it into my JSON file and install it using my script. At the same time I can review other modules and remove them from my system if I no longer need them.
I hope you liked my first pilot post and feel free to re-use the script to maintain your PowerShell modules. I’ve hosted the entire script on the following Github repository