
Azure Function: using a KeyVault certificate to authenticate towards Exchange Online
Published on: 09 March 2021Now that certificate based authentication in Exchange Online management shell reached a certain maturity level, let’s have a look how we can leverage dynamic retreival of a certificate from an Azure KeyVault and use it inside an Azure PowerShell function to connect towards Exchange Online to do some automated tasks. This article outlines the setup and configuration of the different components.
Before we dive into the Azure Function, we first need to ensure that all the required components are configured in our environment. This means that we need to have an Azure KeyVault and an app registration inside Azure Active Directory before we can test out inside our Azure Function. Note: some parts in this article are done using Azure CLI while others are executed manually.
Prepare Azure Key Vault
All journey’s start somewhere and in this case we first need to do create an Azure KeyVault, the quickest way is using Azure CLI. So once signed in using AZ Login, execute the following commands to create a KeyVault:
az group create --name "RG-AzureFunctionDemo" -l "westeurope"
az keyvault create --name "kvvddesignlab1234" --resource-group "RG-AzureFunctionDemo" --location "westeurope"
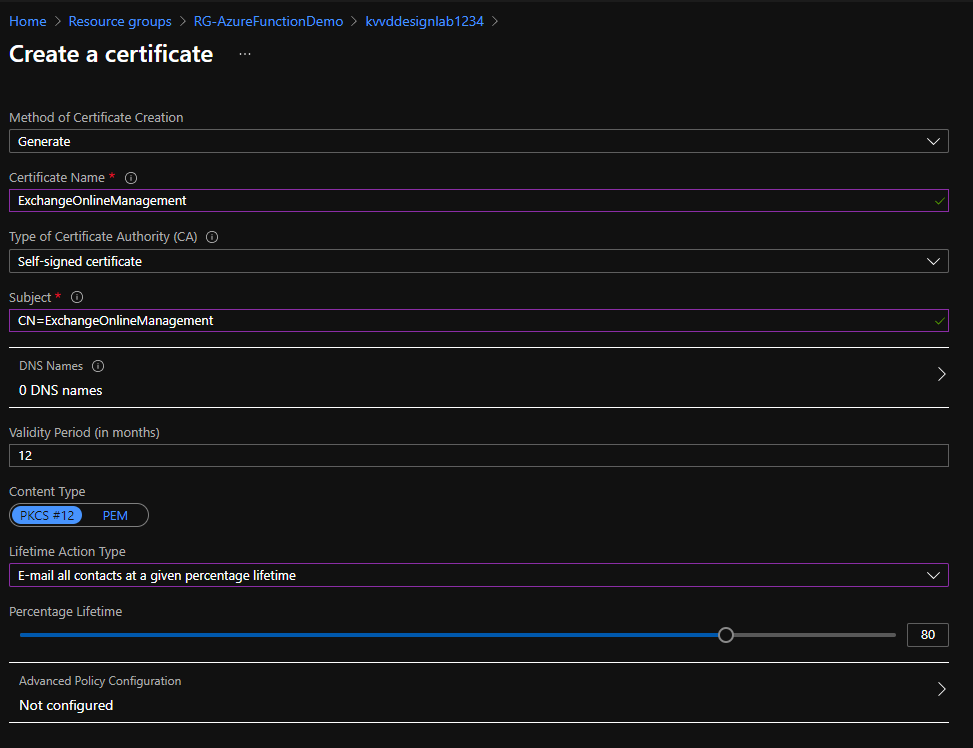
The outcome of these commands is that an Azure Key Vault is created inside a resource group in Western Europe. When an Azure Key vault is created with above commend, you are automatically assigned an access policy that allows you to manage secrets inside the Keyvault. At this point we are ready to generate the certificate that will be used to authenticate against Exchange Online. For this purpose, we can generate a self-signed certificate inside KeyVault by going to our KeyVault resource in the Azure Portal (portal.azure.com > Resource Groups > YourResourceGroup > YourKeyVaultName > Certificates > Generate / Import). For this example, I used the following settings:
- Name: ExchangeOnlineManagement (we will need this name later on in our Azure Function, so keep a note of it)
- Common Name: CN=ExchangeOnlineManagement
- Content Type: PKCS #12
- Lifetime action type: E-mail all contacts at a given percentage lifetime
We need the public portion of the certificate for our Azure AD app registration process, so we need to download it by executing the following command:
az keyvault certificate download --vault-name kvvddesignlab1234 -n ExchangeOnlineManagement -f cert.crt -e DER
Prepare Azure Active Directory
Time to move on towards preparing Azure Active Directory where we will create an app registration that will also generate a service principal. The ApplicationID of this app registration is going to be used when making the connection using a certificate. We start with creating an app registration inside Azure Active Directory by executing the following Azure CLI command:
az ad app create --display-name AZF-ExchangeOnlineMGT --native-app
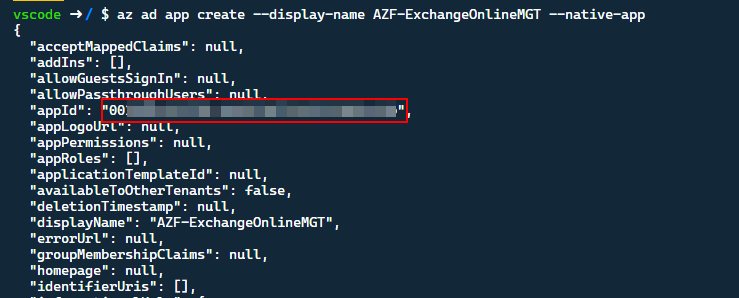
Take a note of the appID value, we will need this later on in our Azure Function.
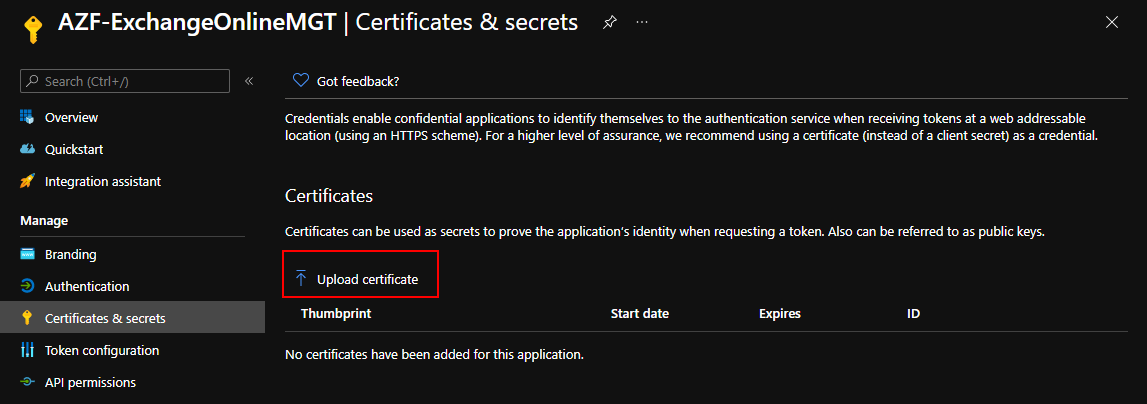
Once the application is created, we need to upload the public portion of our self-signed certificate towards the App registrations “Certificate & Secrets” so that we can authenticate with the private key of the certificate. You can do this by going to the certificate section on the app registration via Azure Active Directory management portal > App registrations > All Applications > YourApplicationName > Certificates & secrets and click the “Upload Certificate” here you provide the cert.crt file that has been downloaded in the previous step.
The next configuration is allowing access towards the Exchange Online Management API, we can configure this in the “API section” of our app registration. The easiest way is by changing the app’s manifest file. (I’ve tried with Azure CLI, however there seems to be limitation in the CLI that only allows Scopes to be added). So head over to Azure Active Directory management portal > App registrations > All Applications > YourApplicationName > Manifest and modify the requiredResourceAccess to reflect the following configuration:
"requiredResourceAccess": [
   {
      "resourceAppId": "00000002-0000-0ff1-ce00-000000000000",
      "resourceAccess": [
         {
            "id": "dc50a0fb-09a3-484d-be87-e023b12c6440",
            "type": "Role"
         }
      ]
   }
],
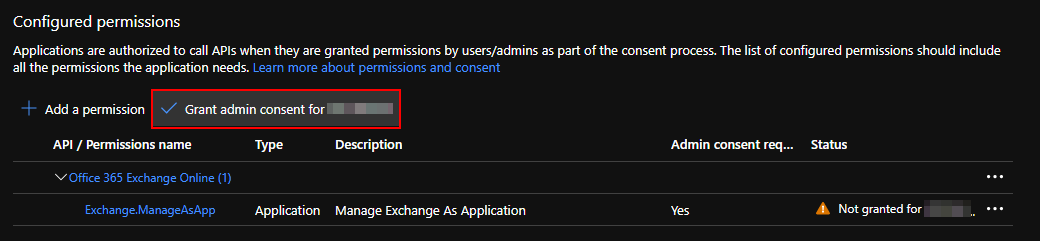
As this is an application permission, we need to execute an administrative consent before the api permissions are usable. Head over to the API Permissions section of the Azure AD App registration and click the “Grant admin consent for YourDirectory” button. Confirm by clicking “Yes”.
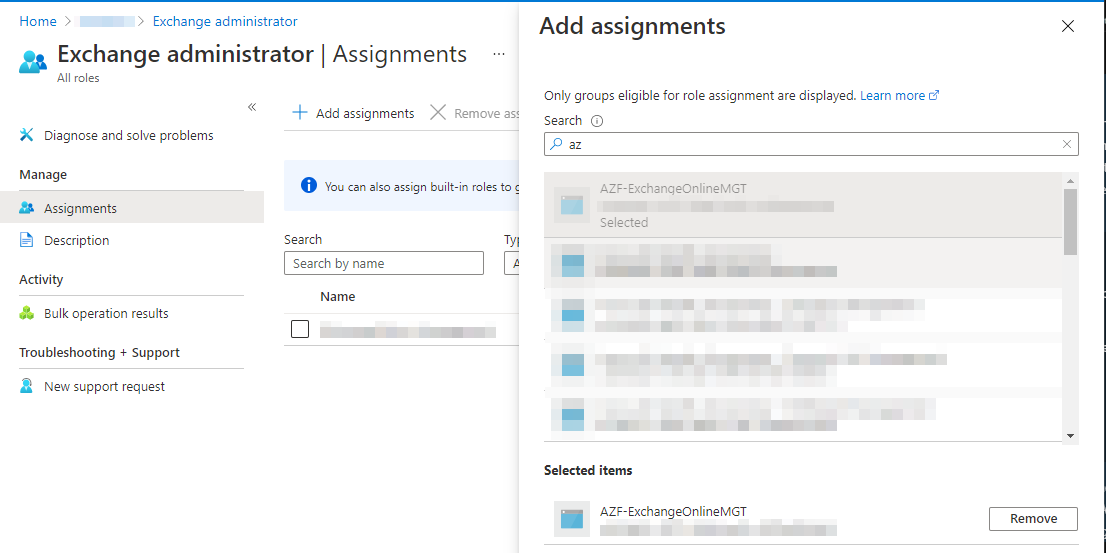
The final step to be done on the app registration, is to add our app registration towards the Exchange Online administrative role in Azure Active Directory. We can assign the “Exchange Administrator” role in the “Roles and administrators” blade of Azure Active Directory, so head over to your Azure AD portal > Roles and administrators > Exchange administrator and click the “Add assignments button”. Here you search for your created app and add the principal towards the “Exchange Administrator” role.
Azure Function
We now finally can switch our attentention towards the subject of this blog post, retreiving a certificate from Azure Keyvault an use it to authenticate against Exchange Online inside an Azure Function. So let’s start by creating our Azure Function by executing the following Azure CLI commands:
# Create Storage Account for Function app
az storage account create -n savddesignlabexchfa1234 -g RG-AzureFunctionDemo -l westeurope --sku Standard_LRS

# Create Function App
az functionapp create --consumption-plan-location westeurope --name FA-VddesignlabExchFA1234 --os-type Windows --resource-group RG-AzureFunctionDemo --runtime powershell --storage-account savddesignlabexchfa1234 --functions-version 3 --disable-app-insights
With the above commands, we create a storage account in Western Europe an a Function App version 3 that runs PowerShell Core
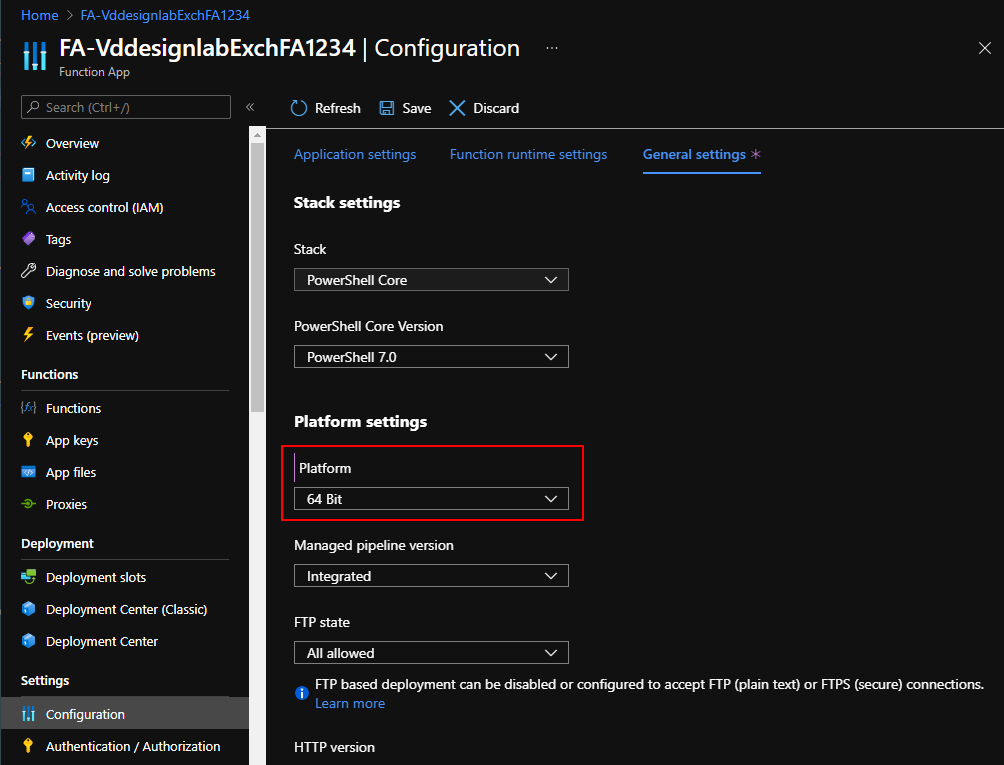
Important for using the Exchange Online management shell is that we use a 64-Bit architecture for the Function app, this is needed as the Exchange Online modules are compiled for a 64-Bit architecture. A 32-Bit Azure function won’t be able to load the Exchange Online V2 management modules. So the very first thing we do on our newly created function app, is to set it to 64 bit by going to the Azure Admin Portal > Resource Groups > YourResourceGroup > YourFunctionAppName > Configuration (under Settings) > Tab General Settings, change the platform setting towards “64 Bit” and save the change. This action will restart your function app.
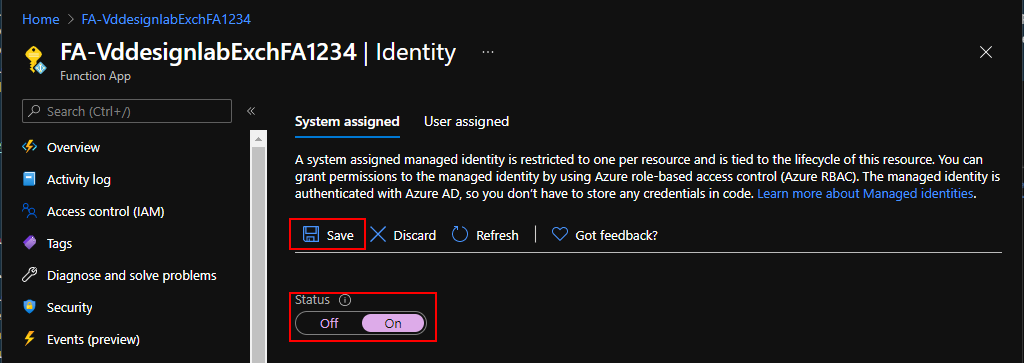
To be able to retrieve the certificate from our KeyVault, we first need to ensure that our function app can authenticate itself against Azure KeyVault. The advantage of using an Azure function is that we can assign it an identity and have Azure manage the credentials for this idententy. For this use case, we are going to use a system assigned managed identity that is tight towards the lifecycle of our Function App. This implies that when we remove the Function app, the managed identity is also automatically purged and potential accesses are revoked. To enable the managed identity, go to Azure Admin Portal > Resource Groups > YourResourceGroup > YourFunctionAppName > Identity (under Settings) > Tab System Assigned, change the status to “On” and save the change.
The managed identity currently won’t be able to retrieve any secrets from our Azure KeyVault as their is no KeyVault access policy defined for our managed identity. To create the access policy, we need to go back to our KeyVault configuration via Azure Admin Portal > Resource Groups > YourResourceGroup > YourKeyVaultName > Access Policies (under Settings). Here we create a new access policy that will grant access towards our function app by selecting “+ Add Access Policy”
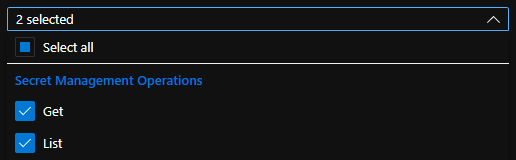
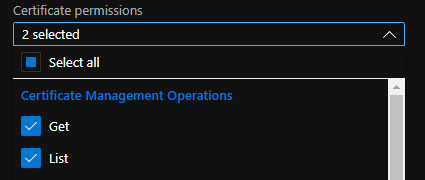
To ensure the private key can be retrieved from our KeyVault, we need to select the “Get” and “List” permission under “Secret Permissions”:
Followed by the “Get” and “List” permission under “Certificate Permissions” to be able to retrieve the certificate:
Finally, we need to search for our function app principal so that we can apply the access policy against it. Search for the name you provided to your function app, select it and click “Add” to create the access policy.

Don’t forget to hit the save button under your access policies to apply the access policies against your KeyVault.
Until now, we prepared our Azure environment to be able to use certificate authentication against Exchange Online. We finally can now start configuring an Azure function that is able to authenticate against Exchange Online. The first item on our list is creating a function and loading the necessary modules. So we need to head over to our function app Azure Portal > Resource Groups > YourResourceGroupName > YourAzureFunctionName > Functions. Here we add a new function and select the “HTTP” trigger template, provide a name and select “Function” as “Authorization level”:
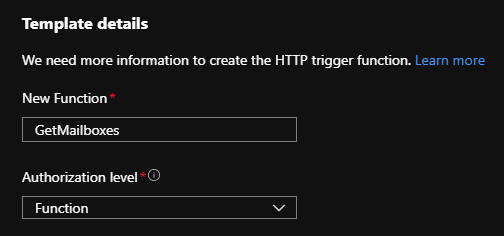
Note: for a production function, an HttpTrigger does not make much sense and a schedule makes more sense. However, for demo purposes a HttpTrigger is much easier to test
Before we jump into the code of the function, we need to modify the functions dependencies and configure which modules need to be loaded into the function. Through the portal, we need to do this with the “App Service Editor” which is currently in preview. You can find this under Azure Portal > Resource Groups > YourResourceGroupName > YourAzureFunctionName > App Service Editor (under Development Tools). Click the “Go” button to open the editor:

On the left hand side, you will have a file selection window. Select the “requirements.psd1” file which contains the dependencies for the Azure Function. In this file, we need to add the “ExchangeOnlineManagent” version 2.0.4 module, Az.KeyVault version 3.4.0 and Az.Accounts version 2.2.6 (latest versions at time of writing). Your “requirements.psd1” file should look like this now:
@{
    'ExchangeOnlineManagement' = '2.0.4'
    'Az.KeyVault' = '3.4.0'
    'Az.Accounts' = '2.2.6'
}
Note: I fixed the versions to ensure that when new versions are released, we don’t potentially automatically break our functions when the modules are updated to the latest versions.
Azure functions won’t automatically manage dependencies enlisted in the requirements file and ignores the file by default, we therefore need to enable the Managed dependency feature inside the host.json file. Open the file with the App Service Editor and ensure that “Enabled” is set to “true” under the managedDependency key:
  "managedDependency": {
    "Enabled": true
  }
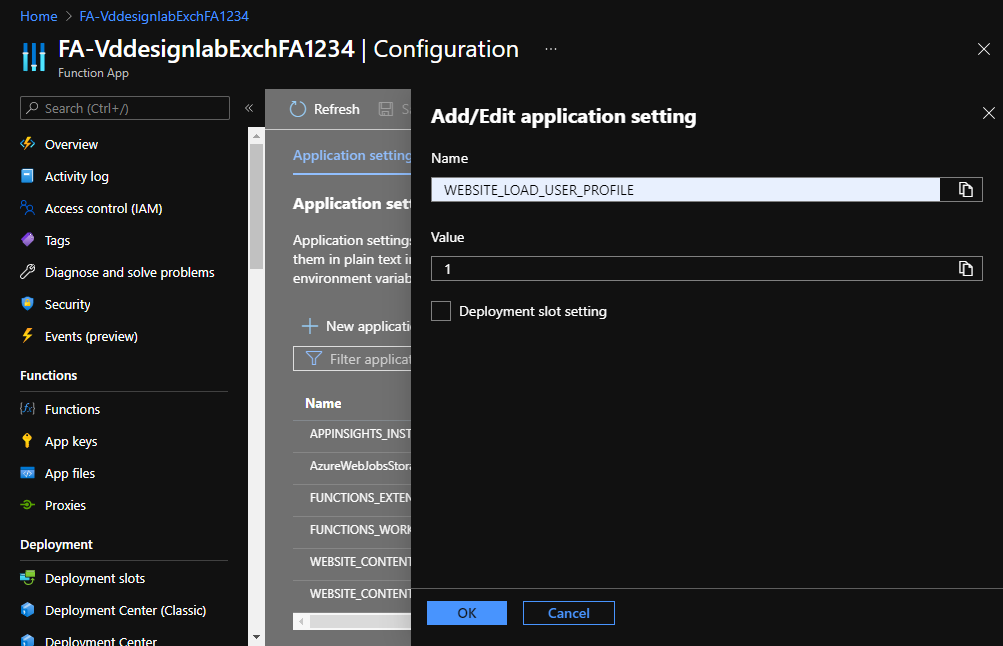
During runtime of the the PowerShell function, the private key is retreived from our KeyVault and is temporary stored. This happens using a “System.Security.Cryptography.X509Certificates.X509Certificate2” object, which will store the private key under the user profile. An Azure function by default does not load the user profile during runtime for performance reasons. To avoid file not found errors in our code, we must configure the function to load the user profile by configuring the WEBSITE_LOAD_USER profile application setting. You can add an application key under Azure Admin Portal > Resource Groups > YourResourceGroup > YourFunctionAppName > Configuration (under Settings) > Tab Application Settings by clicking the ‘New application setting’ button. Here you provide the ‘WEBSITE_LOAD_USER_PROFILE’ name and set the value to ‘1’, confirm by clicking ‘OK’ and save your new application settings:
We are now ready to put some code inside the Azure Function and do a first test run in retrieving data. So head over to your Azure Function via Azure Portal > Resource Groups > YourResourceGroupName > YourAzureFunctionName > Functions > YourHttpTriggerName > Code + Test. Here you can paste in the following code:
using namespace System.Net

# Input bindings are passed in via param block.
param($Request, $TriggerMetadata)

# Write to the Azure Functions log stream.
Write-Host "PowerShell HTTP trigger function processed a request."

$body = "This HTTP triggered function executed successfully."

Write-Host "Retrieving Exchange Online Management certificate from KeyVault"
$Cert = Get-AzKeyVaultCertificate -VaultName "YourVaultName" -Name "ExchangeOnlineManagement"
$PrivateKey = Get-AzKeyVaultSecret -VaultName "YourVaultName" -Name $Cert.Name -AsPlainText
$secretByte = [Convert]::FromBase64String($PrivateKey)
$x509Cert = New-Object System.Security.Cryptography.X509Certificates.X509Certificate2($secretByte, "", "PersistKeySet")


Write-Host "Connecting to Exchange Online"
Connect-ExchangeOnline -AppId "YourApplicationID" -Certificate $x509Cert -Organization "Yourtenant.onmicrosoft.com" -Showbanner:$false

Write-Host "Connected to Exchange Online, retrieving mailbox list"
$body = get-mailbox | Select-object PrimarySMTPAddress,Identity

Write-Host "Disconnecting from Exchange Online"
Disconnect-ExchangeOnline -Confirm:$false

Write-Host "Returning mailbox list in HTTP body"
Push-OutputBinding -Name Response -Value ([HttpResponseContext]@{
    StatusCode = [HttpStatusCode]::OK
    Body = $body
})
Inside the code we do the following actions:
- Fetch the ExchangeOnlineManagement certificate from KeyVault ($Cert = Get-AzKeyVaultCertificate …)
- Fetch the private key from KeyVault ($PrivateKey = Get-AzKeyVaultSecret…)
- Convert the private key into a byte array ($SecretByte = [Convert]…)
- Create an X509 certificate object from the private key ($X509Cert = New-Object…)
- Connect towards Exchange Online using the X509 object (Connect-ExchangeOnline …)
- Retrieve a list of Exchange Online mailboxes ($body = get-mailbox) and minimize information towards Primary SMTP address and the Identity
- Disconnect from Exchange Online, we can only have 3 simultaneous sessions so we need to properly disconnect.
- Add the mailbox list towards the Azure’s Function response
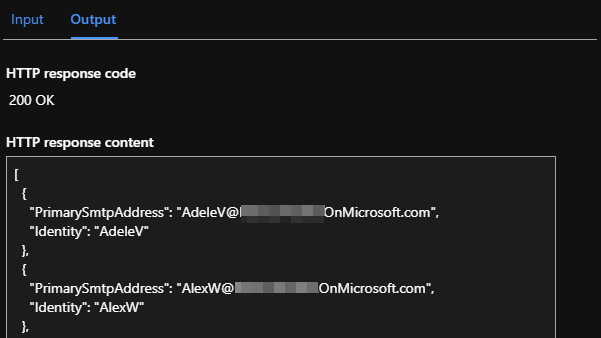
When you test the function, you should have the output of get-mailbox as a JSON object in your output:
In the example above we have hard coded variables, this should be avoided at all cost so that we can re-use the code without doing modification and to avoid that sensitive data is visible in plain text. So let’s clean up our code and define our variables as application settings:
| Application Setting | Description |
|---|---|
| EXO_KeyVaultName | your KeyVault Name |
| EXO_KeyVaultKey | your certificate key name inside KeyVault |
| EXO_AzureADAppID | your application ID in Azure Active Directory |
| EXO_OrgID | your Exchange Online organization ID ‘tenantName.onmicrosoft.com’ |
These application settings are available inside our PowerShell function as environmental variables and can be used by calling $env:ApplicationSettingID in our code. This results in the following final code:
using namespace System.Net

# Input bindings are passed in via param block.
param($Request, $TriggerMetadata)

# Write to the Azure Functions log stream.
Write-Host "PowerShell HTTP trigger function processed a request."

$body = "This HTTP triggered function executed successfully."

Write-Host "Retrieving Exchange Online Management certificate from KeyVault"
$cert = Get-AzKeyVaultCertificate -VaultName $env:EXO_KeyVaultName -Name $env:EXO_KeyVaultKey
$secret = Get-AzKeyVaultSecret -VaultName $env:EXO_KeyVaultName -Name $cert.Name -AsPlainText
$secretByte = [Convert]::FromBase64String($secret)
$x509Cert = New-Object System.Security.Cryptography.X509Certificates.X509Certificate2($secretByte, "", "PersistKeySet")

Write-Host "Connecting to Exchange Online"
Connect-ExchangeOnline -AppId $env:EXO_AzureADAppID -Certificate $x509Cert -Organization $env:EXO_OrgID -Showbanner:$false

Write-Host "Connected to Exchange Online, retrieving mailbox list"
$body = get-mailbox | Select-object PrimarySMTPAddress,Identity

Write-Host "Disconnecting from Exchange Online"
Disconnect-ExchangeOnline -Confirm:$false

# Associate values to output bindings by calling 'Push-OutputBinding'.
Push-OutputBinding -Name Response -Value ([HttpResponseContext]@{
    StatusCode = [HttpStatusCode]::OK
    Body = $body
})
Conclusion
The code above is just a simple function that retreives some data in Exchange Online, however you can use it as a base to establish the connection and do some very fancy stuff inside Exchange Online in full unattended scripts.
It’s important to highlight that the implementation above is another approach in loading certificates in Azure functions. Azure functions have the possibility to import key vault certificates via the ‘TLS/SSL settings’ pane, with this method you need to specify which certificate thumprint you require to authenticate from within your code. When rotating certificates inside KeyVault, the thumbprint changes and this most likely will break your function (I havent’ confirmed this yet). The approach above will still function once the the certificate is rotaded, altough you also must update your Azure AD app public certificate portion (which also can be automated).
I hope you find this post usefull and don’t hesitate to reach out to me with comments or feedback.