
Add and remove Azure AD role assignments using Azure CLI
Published on: 02 April 2021For a customer, I recently needed to create a bash script that prepared their Azure environment for Terraform. Amongst Azure resources, the script also created service principals for Azure DevOps pipelines that would run Terraform. The Terraform code in Azure DevOps included the creation/destruction of Azure AD groups using the AzureAD provider. The Terraform documentation for managing groups with the azuread provider states that the service principal needs to be a member of the ‘User Account Administrator’ role in Azure AD to be able to delete Terraform created groups.
The bash script was using Azure CLI to create the different resources in Azure. I intended to use the “az role assignment create” command to setup the necessary permissions on the Service Principal, however I quickly discovered this was not possible inside Azure CLI for Azure Active Directory Roles and needed to find a solution as PowerShell was not an option.
Microsoft Graph API
After some research, I discovered in the Microsoft Graph Beta API that you can assign custom roles. The web page itself documented the needed endpoints and parameters, but did not include examples on how to use them. The web page itself can be found here: Assign custom admin roles using the Microsoft Graph API in Azure Active Directory
Within Azure CLI, you can execute rest methods using the ‘az rest’ command. So I embarked to assign the required permissions using this command inside my script. Let me guide you through the different steps to achieve this.
First, let’s start to retrieve a list of roles inside Azure Active Directory. So start up a Linux terminal where Azure CLI is installed and login into Azure using ‘az login –use-device-code’, ensure you log in using an account which has the necessary permissions to change role memberships.
Once logged in, we can execute the following bash command to retrieve our Azure AD roles:
    URI=$(echo "https://graph.microsoft.com/beta/directoryRoles");
    az rest --method GET --uri $URI --header Content-Type=application/json
Upon completion of the commands, you get a JSON object which contains activated AD roles in Azure AD:
{
  "@odata.context": "https://graph.microsoft.com/beta/$metadata#directoryRoles",
  "value": [
    {
      "deletedDateTime": null,
      "description": "Can manage all aspects of Azure AD and Microsoft services that use Azure AD identities.",
      "displayName": "Global Administrator",
      "id": "xxxxxxxx-xxxx-xxxx-xxxx-xxxxxxxxxxxx",
      "roleTemplateId": "xxxxxxxx-xxxx-xxxx-xxxx-xxxxxxxxxxxx"
    },
    {
      "deletedDateTime": null,
      "description": "Can read basic directory information. Commonly used to grant directory read access to applications and guests.",
      "displayName": "Directory Readers",
      "id": "xxxxxxxx-xxxx-xxxx-xxxx-xxxxxxxxxxxx",
      "roleTemplateId": "xxxxxxxx-xxxx-xxxx-xxxx-xxxxxxxxxxxx"
    },
    {
      "deletedDateTime": null,
      "description": "Can manage all aspects of the Exchange product.",
      "displayName": "Exchange Administrator",
      "id": "xxxxxxxx-xxxx-xxxx-xxxx-xxxxxxxxxxxx",
      "roleTemplateId": "xxxxxxxx-xxxx-xxxx-xxxx-xxxxxxxxxxxx"
    },
    {
      "deletedDateTime": null,
      "description": "Device Administrators",
      "displayName": "Azure AD Joined Device Local Administrator",
      "id": "xxxxxxxx-xxxx-xxxx-xxxx-xxxxxxxxxxxx",
      "roleTemplateId": "xxxxxxxx-xxxx-xxxx-xxxx-xxxxxxxxxxxx"
    }
  ]
}
JSON format is fine for a human eye to read (when not too complex). However when we want to use a value like the ID to actually grant a role assignment, we need to be able to parse the JSON file. The tool JQ is able to slice, filter, map and transform JSON, so we are going to use this to parse our JSON response from the Graph API. Ensure it’s installed, for an Ubuntu based distribution you can install it using sudo apt-get install jq
To filter out the displayName, we need to pipe our JSON output into jq:
URI=$(echo "https://graph.microsoft.com/beta/directoryRoles");
az rest --method GET --uri $URI --header Content-Type=application/json | jq '.value[].displayName' -r
Because our roles are returned in a value array by ‘az rest’, we first need to step into the value array with .value[]. Afterwards, we ask for the displayName (.displayName) of each entry and instruct JQ to output in raw format (-r).
This results in a list of active roles:

Add Role Assignment
When we look at the Microsoft documentation to add a role assignment towards a user, the Microsoft Graph API expects the following parameters:
- PrincipalID: the object ID of the user we want to add to a role group, this is the GUID of the Azure AD user
- roleDefinitionId: the definition ID of the role we want to assign. This is the ID of the directory role which we retrieved in very first rest command of this article.
- directoryScopId: an optional scope for the role assignment. You can provide this if you need to limit the role assignment towards a specific administrative unit.
We can use Azure CLI commands and the ‘az rest’ methods to retrieve these values. To retrieve the GUID of the Azure AD user, we use the standard ‘az ad user list’ command and store the objectID parameter in a bash variable:
# Retrieve the user ID for a given user principal name and display to console
user_objectID=$(az ad user list --upn "demo.user@xxxxxxxx.OnMicrosoft.com" --query [].objectId -o tsv)
echo $user_objectID
I started the article with a list of activated directory roles in Azure AD. To retrieve the role definition ID from this list, we will need to filter our results. With JQ we can further filter our JSON results to get the ID of a specific role. For example, the following command will only provide the information of the “Global Administrator” role:
# Retrieve the Global Administrator role
URI=$(echo "https://graph.microsoft.com/beta/directoryRoles");
az rest --method GET --uri $URI --header Content-Type=application/json | jq '.value[] | select(.displayName | contains("Global Administrator"))'
Result of fetching the “Global Administrator” role information:

JQ by default outputs JSON, so we can pipe it towards another JQ instance to retrieve the ID of the role in a raw format (-r):
# Retrieve the Global Administrator role
URI=$(echo "https://graph.microsoft.com/beta/directoryRoles");
az rest --method GET --uri $URI --header Content-Type=application/json | jq '.value[] | select(.displayName | contains("Global Administrator"))' | jq '.id' -r
Now all we need to do on the roleDefinitionId is to refactor our commands to make it more generic and use variables. Our goal is to use this in an script so we want to avoid hard coding names like the ‘Global Administrator’ name inside our code. JQ supports input arguments (–arg) which present themselves as variables that can be used in filter statements. For example: when we specify the displayName argument, the value can be used inside our select statement using $displayName. Let’s refactor our code to:
user_role="Global Administrator"
# Retrieve the role provided in user_role
URI=$(echo "https://graph.microsoft.com/beta/directoryRoles");
roleDefinitionId=$(az rest --method GET --uri $URI --header Content-Type=application/json | jq --arg displayName "${user_role}" '.value[] | select(.displayName | contains($displayName))' | jq '.id' -r)
# Display Result
echo $roleDefinitionId
Executing the code above results in a plain text role definition ID stored in a variable. This variable will be used later to add a role assignment:

We now have all the information required to create a role assignment using the roleAssignments endpoint. To provide the Graph API the required information, we need to pass our information as a JSON object into the body of our API call. The API expects the following JSON structure:
{
    "principalId":"xxxxxxxx-xxxx-xxxx-xxxx-xxxxxxxxxxxx",
    "roleDefinitionId":"xxxxxxxx-xxxx-xxxx-xxxx-xxxxxxxxxxxx",
    "directoryScopeId":"/"
}
We can use JQ to construct the expected body where we pass the information into our JQ statement using arguments.
BODY=$( jq -n \
  --arg principalId "xxxxxxxx-xxxx-xxxx-xxxx-xxxxxxxxxxxx" \
  --arg roleDefinitionId "xxxxxxxx-xxxx-xxxx-xxxx-xxxxxxxxxxxx" \
  --arg directoryScopeId "/" \
  '{principalId: $principalId, roleDefinitionId: $roleDefinitionId, directoryScopeId: $directoryScopeId}'
)
echo $BODY
The result is the expected JSON format stored in a variable:

All we have to do now is to refactor our code and use our variables in a post method towards the Graph API endpoint:
URI=$(echo  "https://graph.microsoft.com/beta/roleManagement/directory/roleAssignments")
BODY=$( jq -n \
            --arg principalId "$user_objectID" \
            --arg roleDefinitionId "$roleDefinitionId" \
            --arg directoryScopeId "/" \
        '{principalId: $principalId, roleDefinitionId: $roleDefinitionId, directoryScopeId: $directoryScopeId}' )
az rest --method POST --uri $URI --header Content-Type=application/json --body "$BODY"
On success, you get the role assignment information back in JSON format:
{
  "@odata.context": "https://graph.microsoft.com/beta/$metadata#roleManagement/directory/roleAssignments/$entity",
  "directoryScopeId": "/",
  "id": "5xxx_mJe20exxXXxxJo4sTXX_xxxxxxxxxxxxxxxx_k-1",
  "principalId": "xxxxxxxx-xxxx-xxxx-xxxx-xxxxxxxxxxxx",
  "resourceScope": "/",
  "roleDefinitionId": "xxxxxxxx-xxxx-xxxx-xxxx-xxxxxxxxxxxx"
}
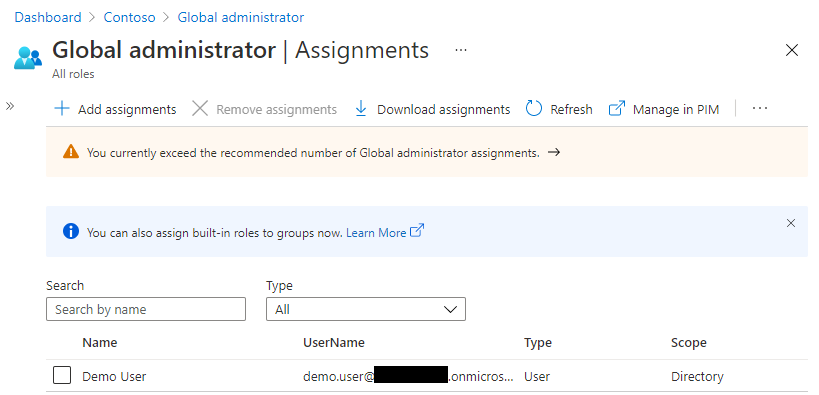
When navigating to the Global Administrators role in Azure AD, we see our demo user has been added as a global administrator:
Remove Role Assignment
Now that we have seen how to add a role assignment using Azure CLI commands, let’s have a quick look how to remove them again. According to the Microsoft documentation, we can use the following Graph API endpoint to remove a role assignment:
DELETE https://graph.microsoft.com/beta/roleManagement/directory/roleAssignments/lAPpYvVpN0KRkAEhdxReEJC2sEqbR_9Hr48lds9SGHI-1
The documentation is not that extensive, but the Graph API expects that you pass the role assignment ID in the URL using a DELETE action. To do this, we first need to retrieve the role assignment ID, so back to our Linux terminal.
We already know that we can retrieve the different role assignments by making a GET call towards the roleAssignments endpoint, however we need to pass in a filter to retrieve only the role assignments for our user. So we filter on the principal ID using a query string filter and pass in the principalId of the user which we already fetched in a previous step:
# Retrieve Object ID
user_objectID=$(az ad user list --upn "demo.user@xxxxxxxx.OnMicrosoft.com" --query [].objectId -o tsv)

#Retrieve role assignments
URI=$(echo "https://graph.microsoft.com/beta/roleManagement/directory/roleAssignments?\$filter=principalId%20eq%20'${user_objectID}'")
az rest --method GET --uri $URI --header Content-Type=application/json
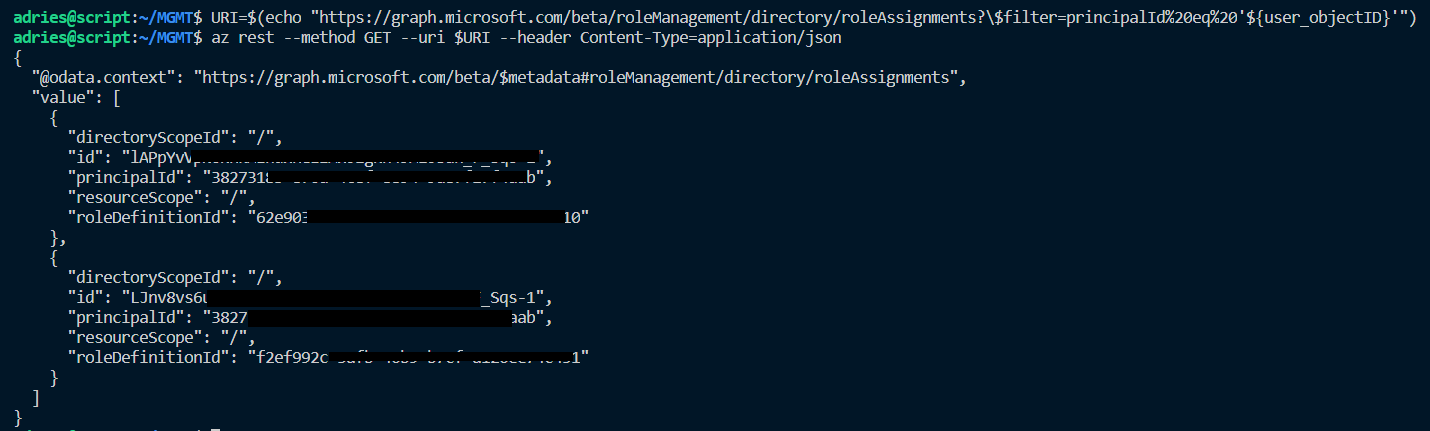
The result is a list of all role assignments the user has and requires to be filtered so that we can have the ID attribute of the role assignment we want to remove (‘Global Administrator’ in this case). The main caveat here is that the roleDefinitionId on the user role assignment list does not match the ID we get from the directoryRoles endpoint, instead it enlists the roleTemplateId:
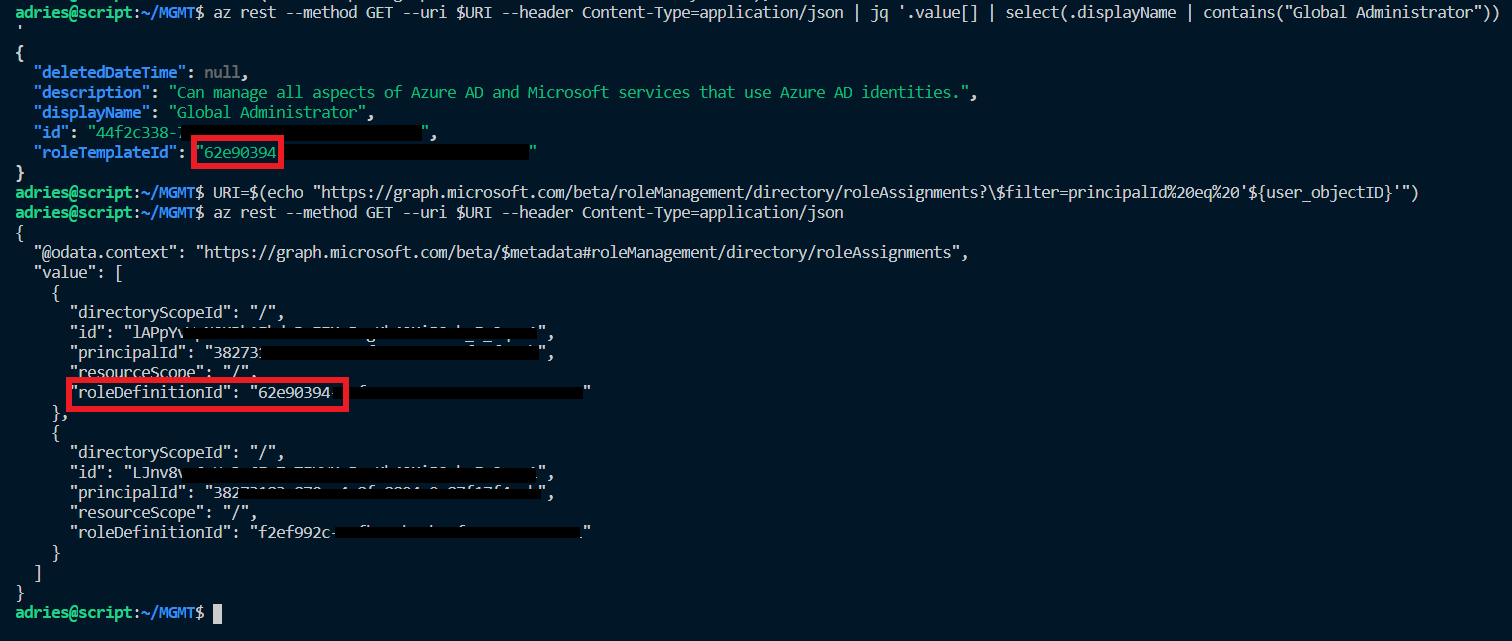
So when we construct our filter for the ‘Global Administrator’ role, we need to pass in the roleTemplateId. Which we don’t yet have at this point, so we need to retrieve it first using the following code:
user_role="Global Administrator"
# Retrieve the role provided in user_role
URI=$(echo "https://graph.microsoft.com/beta/directoryRoles");
roleTemplateId=$(az rest --method GET --uri $URI --header Content-Type=application/json | jq --arg displayName "${user_role}" '.value[] | select(.displayName | contains($displayName))' | jq '.roleTemplateId' -r)
# Display Result
echo $roleTemplateId
Afterwards, we can filter our roleAssignments for our user and store the resulting ID in a variable:
URI=$(echo "https://graph.microsoft.com/beta/roleManagement/directory/roleAssignments?\$filter=principalId%20eq%20'${user_objectID}'")
roleAssignmentId=$(az rest --method GET --uri $URI --header Content-Type=application/json | jq --arg roleTemplateId ${roleTemplateId} '.value[] | select(.roleDefinitionId | contains($roleTemplateId))' | jq '.id' -r)
echo "$roleAssignmentId"
Finally, we remove the role assignment by calling the Graph API:
URI=$(echo "https://graph.microsoft.com/beta/roleManagement/directory/roleAssignments/${roleAssignmentId}")
az rest --method DELETE --uri $URI --header Content-Type=application/json
Note: upon success, the command does not return a result. So if you want to check out the result, you need to go to the Azure AD portal and verify.
Script
I’ve combined all the principles off this article into a Bash script that is hosted on my Github repository changeRoleassignment.sh. The script works with input parameters and supports both adding a role assignment and removing a role assignment. Expected parameters are:
- Action (Mandatory, possible values: add or remove)
- User Principal Name (Mandatory)
- Role Assignment Display Name (Mandatory)
- Scope (Optional)
To add a role assignment for a given user:
changeRoleAssignments.sh add demo.user@xxxxxxxx.OnMicrosoft.com "Global Administrator"
To remove a role assignment for a given user:
changeRoleAssignments.sh remove demo.user@xxxxxxxx.OnMicrosoft.com "Global Administrator"
Conclusion
I hope you can use the learnings of this article to solve some of your automation tasks. For me it was quite challenging as I don’t do bash scripting often. It’s also based on the beta endpoints of the Microsoft Graph API, so documentation was not that extensive, support is limited and it can be modified by Microsoft at any time. During creation of the code, I’ve also noticed errors in the Microsoft documentation. I’ve reported them through a Github issue and was quite pleased that my suggestions were incorporated into the document quite quickly.
Fingers crossed that Azure CLI will support adding Azure AD role assignments in the future like it’s the case with PowerShell, until then feel free to use the knowledge and script of this article.